Set up your CLI environment
Linux or Mac OS CLI
Note
Python 3+ is recommended for all commands in this article
Installation on Linux and Mac
When installing the CLI using pip, it is recommended to use a python virtual environment to contain the required dependencies. The examples below all make reference to the use of a virtual environment.
Operating system specific steps Here is an outline for installing the Openstack command line tools on the common Linux/Unix based systems. This includes MacOS as it runs a BSD based system.
# Make sure the package cache is up to date and ensure you have
# Python3 installed
sudo apt update
sudo apt install -y python3-venv python3-dev

# create a virtual environment using the Python3 virtual environment module
python3 -m venv venv

# activate the virtual environment
source venv/bin/activate

# install the Openstack commandline tools into the virtual environment
pip install -U pip \
wheel \
python-openstackclient
# from a terminal session install virtualenv
sudo pip install virtualenv

# if the above fails and your on python 2.x then run
sudo easy_install pip
sudo pip install virtualenv

# Create a new virtual environment and activate it
virtualenv venv
source venv/bin/activate

# Install the Python openstack client libraries into your virtual environment
        pip install -U pip \
python-openstackclient
# Make sure the package cache is up to date and ensure you have
# Python3 installed
sudo yum update -y
sudo yum install -y python3

# create a virtual environment using the Python3 virtual environment module
python3 -m venv venv

# activate the virtual environment
source venv/bin/activate

# install the Openstack commandline tools into the virtual environment
pip install -U pip \
python-openstackclient
# Create a new virtual environment and activate it
python -m venv venv-openstackcli
source venv-openstackcli/bin/activate

# Install the Python openstack client libraries into your virtual environment
pip install -U python-openstackclient
Upgrading the CLI
To keep the command line tools up to date, you will need to perform upgrades on them after changes have come out. The following code snippet will upgrade all of the tools listed above; make sure that you have activated your virtual environment before running the command below:
Additional CLI tools
Should you be moving into more advance projects that require the reader to interact with other parts of FlexiHPC then the following tools will need to be installed
Kubernetes CLI Tools
Note
If installing the Networking or HOT templating CLI tools then you want need to install either of the following tools python-heatclient or python-neutronclient
pip install -U pip \
python-heatclient \
python-neutronclient \
python-octaviaclient \
python-magnumclient
Networking CLI Tools
Note
If installing the Kubernetes CLI tools this is included
HOT Templating CLI Tools
Note
If installing the Kubernetes CLI tools this is included
Object Storage CLI Tools
Configuration on Linux and Mac
Source an openstack RC file
When no configuration arguments are passed, the OpenStack client tools will try to obtain their configuration from environment variables. To help you define these variables, the cloud dashboard allows you to download an OpenStack RC file from which you can easily source the required configuration.
To download an OpenStack RC file from the dashboard:
- Log in to the FlexiHPC dashboard and select your project.
- From the left hand menu select “API Access” and click on “Download OpenStack RC File”. Save the “OpenStack RC File” file on to the host where the client tools are going to be used from.
- Source the configuration from the OpenStack RC file:
- When prompted for a password, enter the password of the user who downloaded the file. Note that your password is not displayed on the screen as you type it in.
Warning
You should never type in your password on the command line (or pass it as an argument to the client tools), because the password will be stored in plain text in the shell history file. This is unsafe and could allow a potential attacker to compromise your credentials.
- You can confirm the configuration works by running a simple command, such as
openstack network listand ensuring it returns no errors.
Note
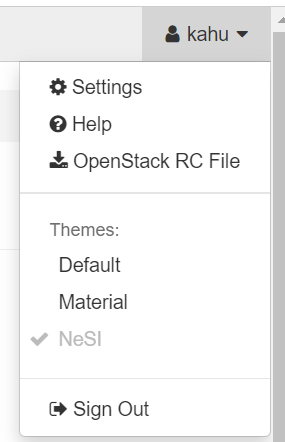
You are also able to download the Openstack RC file from the top-right corner where your login details are display as shown below:
Using the CLI on Linux and Mac
This page assumes that you have installed the python virtual environment and other dependencies from earlier in this section of the documentation. If you have, then the following should make sense.
- Activate your virtual environment.
- Source an openstack RC file
- Invoke the CLI with the openstack command
For a reference of all commands supported by the CLI, refer to the OpenStack Client documentation.